
How to set up the checkout step: offer, price and order bumps
Configure your funnel checkout: pick the main offer, override the price, add a payment plan and up to two order bumps, and route what happens after payment.

 By Knola4 min read
The checkout step is where the money moves, so its settings are split deliberately: what buyers pay lives in the checkout settings (this guide), and how the page looks lives in the design studio (see checkout designs). The price shown always equals the price charged, because both come from your offer.
Open the checkout settings
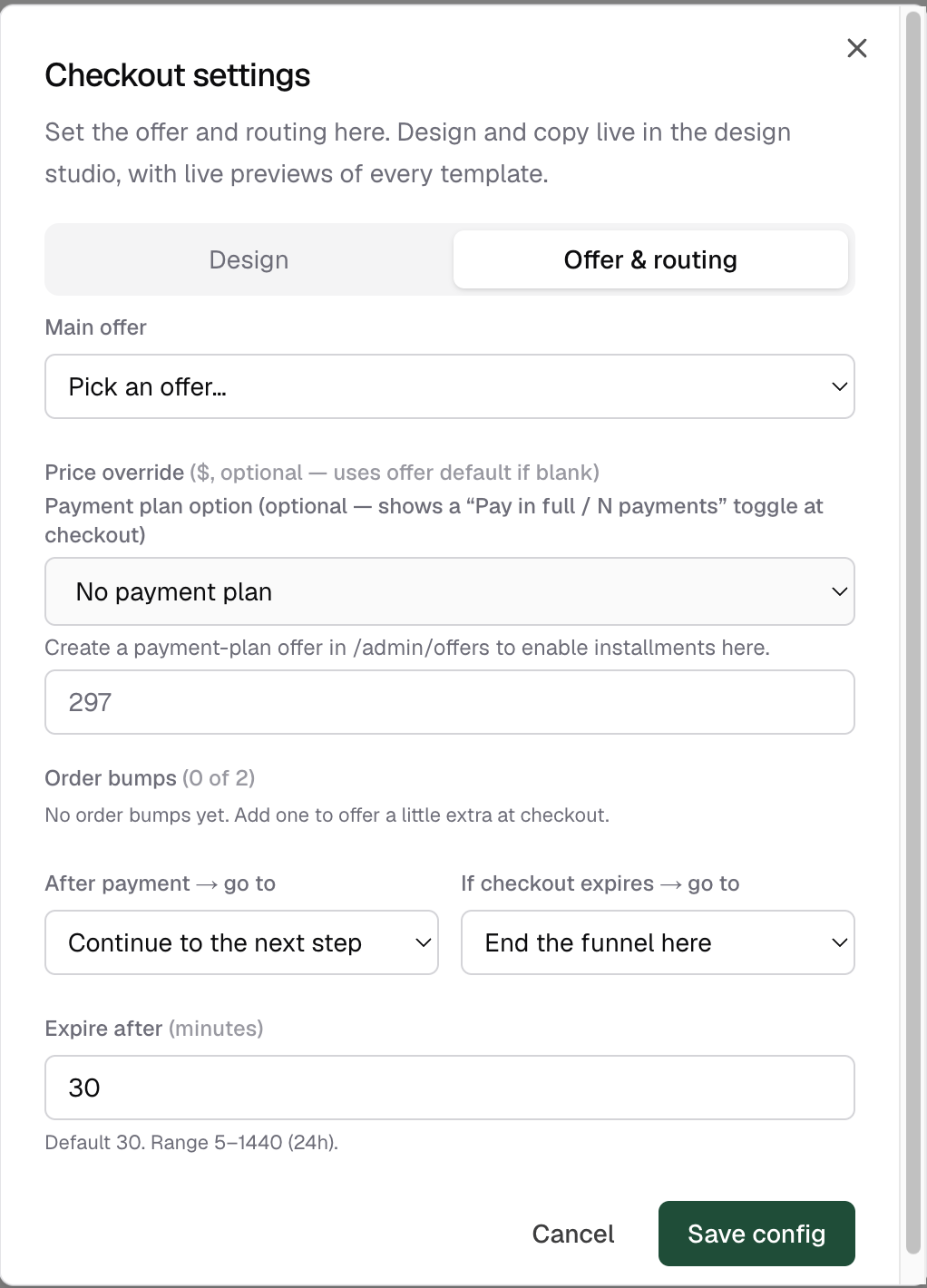
On the funnel canvas, the checkout card carries a ⚙ pill. It reads Offer once configured, or Configure in amber while empty. Click it to open the Checkout settings dialog. Two tabs split the job: Design (which points you to the design studio for templates and copy) and Offer & routing (everything in this guide).
Pick the main offer
Under Main offer, pick the offer this checkout sells. Offers that are not yet synced to your connected Stripe account are listed but disabled, marked (not synced). Sync them from the Offers screen first. If the list is empty, create an offer in Offers and come back.
Override the price or add a payment plan
Two optional pricing controls sit under the offer picker:
- Price override: charge a different amount in this funnel only, leaving the offer’s default untouched. Blank means the offer default. Useful for a launch price or an audience-specific deal.
- Payment plan option: pick a payment-plan offer and buyers get a "Pay in full / N payments" toggle at checkout. Only offers created with payment-plan billing appear here; create one in Offers to enable instalments.
Add order bumps (up to 2)
Under Order bumps, click + Add bump and pick an offer, a small tick-box add-on shown on the checkout itself. You can add up to two. The bump’s price pre-fills from the offer’s default so what is displayed matches what Stripe charges; adjust it per funnel if you want.
Route what happens after payment
The last section wires the checkout into the rest of the funnel:
- After payment → go to: where a buyer lands after paying. The default, Continue to the next step, follows the funnel order, usually your upsell or thank-you page.
- If checkout expires → go to: where a visitor goes if they sit on the checkout past the time limit. The default, End the funnel here, simply ends the flow.
- Expire after: the time limit in minutes. Default 30, range 5–1440 (24h).
Click Save config. The card’s pill turns into Offer with the offer name and price on hover, and the canvas draws the money arrow in green.
Can I use a funnel checkout as the buy button on my own website?
Yes. The checkout card on the canvas has a Payment link button that copies the checkout step’s public URL. Link any button on an external site straight to it.
Why is my offer greyed out in the Main offer list?
It isn’t synced to Stripe yet, so Knola can’t charge for it. Open the Offers screen, sync the offer, and it becomes selectable.
How many order bumps can a checkout have?
Two. That is a Stripe checkout limit, and in practice one well-chosen bump usually converts better than a crowded order form anyway.