How to brand your school: logo, colours and fonts
Set your logo, brand colour, fonts, hero banner and gallery once, and Knola carries them through your school page, checkouts, emails and course player.

 By Knola4 min read
Your Brand kit is one screen, and everything on it flows everywhere: your slides and videos, your school page, sales pages, checkouts, the course player, and the emails that send in your school’s name. Set it once and every surface picks it up, with nothing to redo page by page.
Open your Brand kit
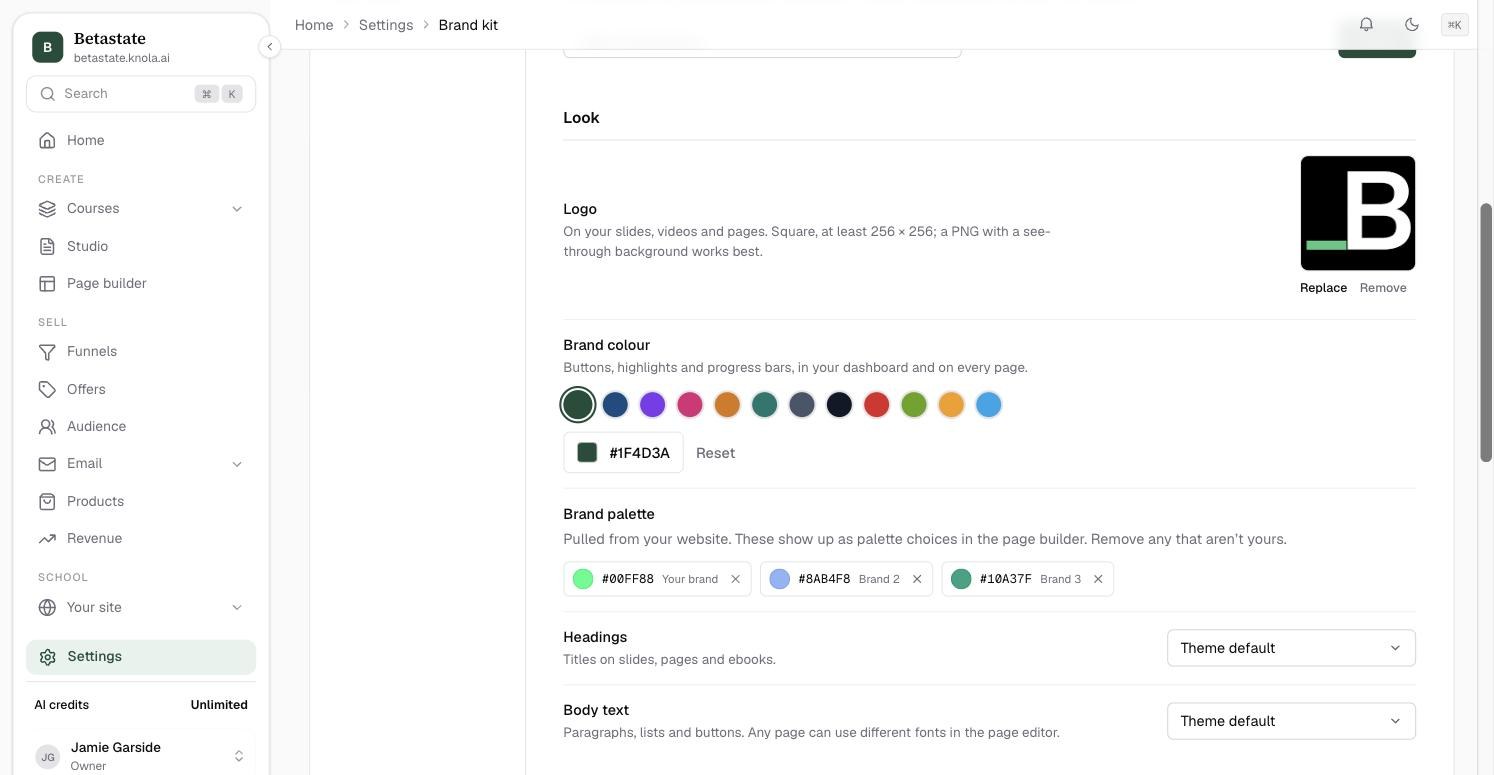
Open Settings at the foot of the sidebar, then Brand kit. The look is under Look: logo, brand colour, palette and fonts. Everything Knola makes for you uses them, from the next thing on.
Upload your logo
Upload a Logo: a square image, at least 256 × 256; a PNG with a see-through background works best. It goes on your slides, videos and pages, and into your school’s top bar, your emails and the course player. Replace or Remove it any time.
Pick your brand colour
Set your Brand colour: pick a swatch or type a hex code. It is used for buttons, highlights and progress bars, in your dashboard and on every page. This one colour does the heavy lifting: the hero gradient on your school page, every primary button a buyer clicks, the progress indicators students watch fill up, and the accent in your branded emails.
Below it, the Brand palette holds extra colours (usually found by the website import). Each one becomes a palette choice in the page builder’s Style tab, named Your brand, Brand 2 and so on. Remove any that aren’t yours with the × on the chip.
Choose your fonts
Pick a font for Headings (titles on slides, pages and ebooks) and Body text (paragraphs, lists and buttons). These are school-wide defaults; any page can use different fonts in the page editor. Theme default hands the choice back to each page’s theme.
Your banner and gallery live on the School page
The wide banner (Hero image, 1500×500 looks best) and the Gallery of up to 6 more images are part of your school page, so they are set under Your site → School page. See How to edit your school page.
Know where your brand flows
Nothing else to wire up. From this one screen your brand reaches:
- Your school home page: logo, hero, and every accent in your colour.
- Pages and funnels: brand colour, palette and fonts as defaults in the page builder.
- Checkouts: buy buttons and accents in your colour, so paying never feels like leaving your site.
- Platform emails: your logo and colour on every email that sends in your school’s name (preview them under Students → Emails).
- The course player and certificate pages your students see.
Does my branding apply to the emails Knola sends for me?
Yes. Emails that send in your school’s name (course access, welcome, certificates and the rest) carry your logo and brand colour. Preview each one under Students → Emails.
Can each course or page have its own colours and fonts?
A page can, and a course cannot. In the page editor's Style tab a single page overrides the fonts, the theme and the colour, while everything you leave on its defaults keeps following your Brand kit. Courses, checkouts, emails and the course player all follow your Brand kit.
What size should my logo and hero image be?
Logo: square, at least 256 × 256; a PNG with a see-through background works best. Hero image (on the School page): a wide banner; 1500×500 looks best.